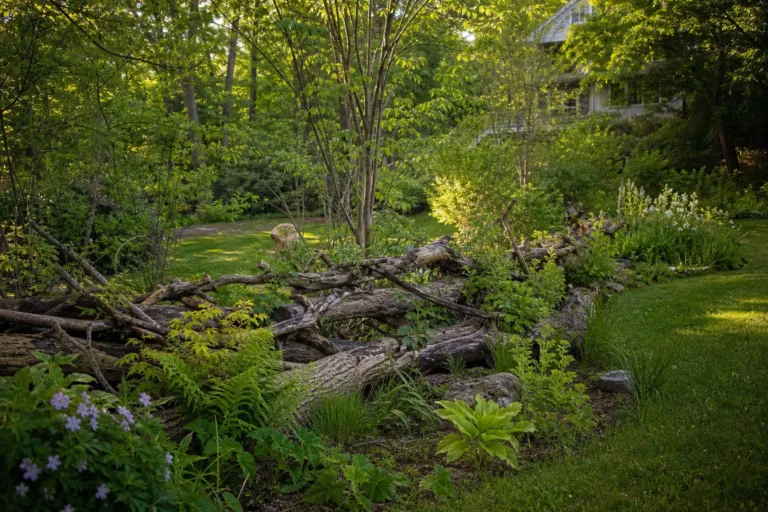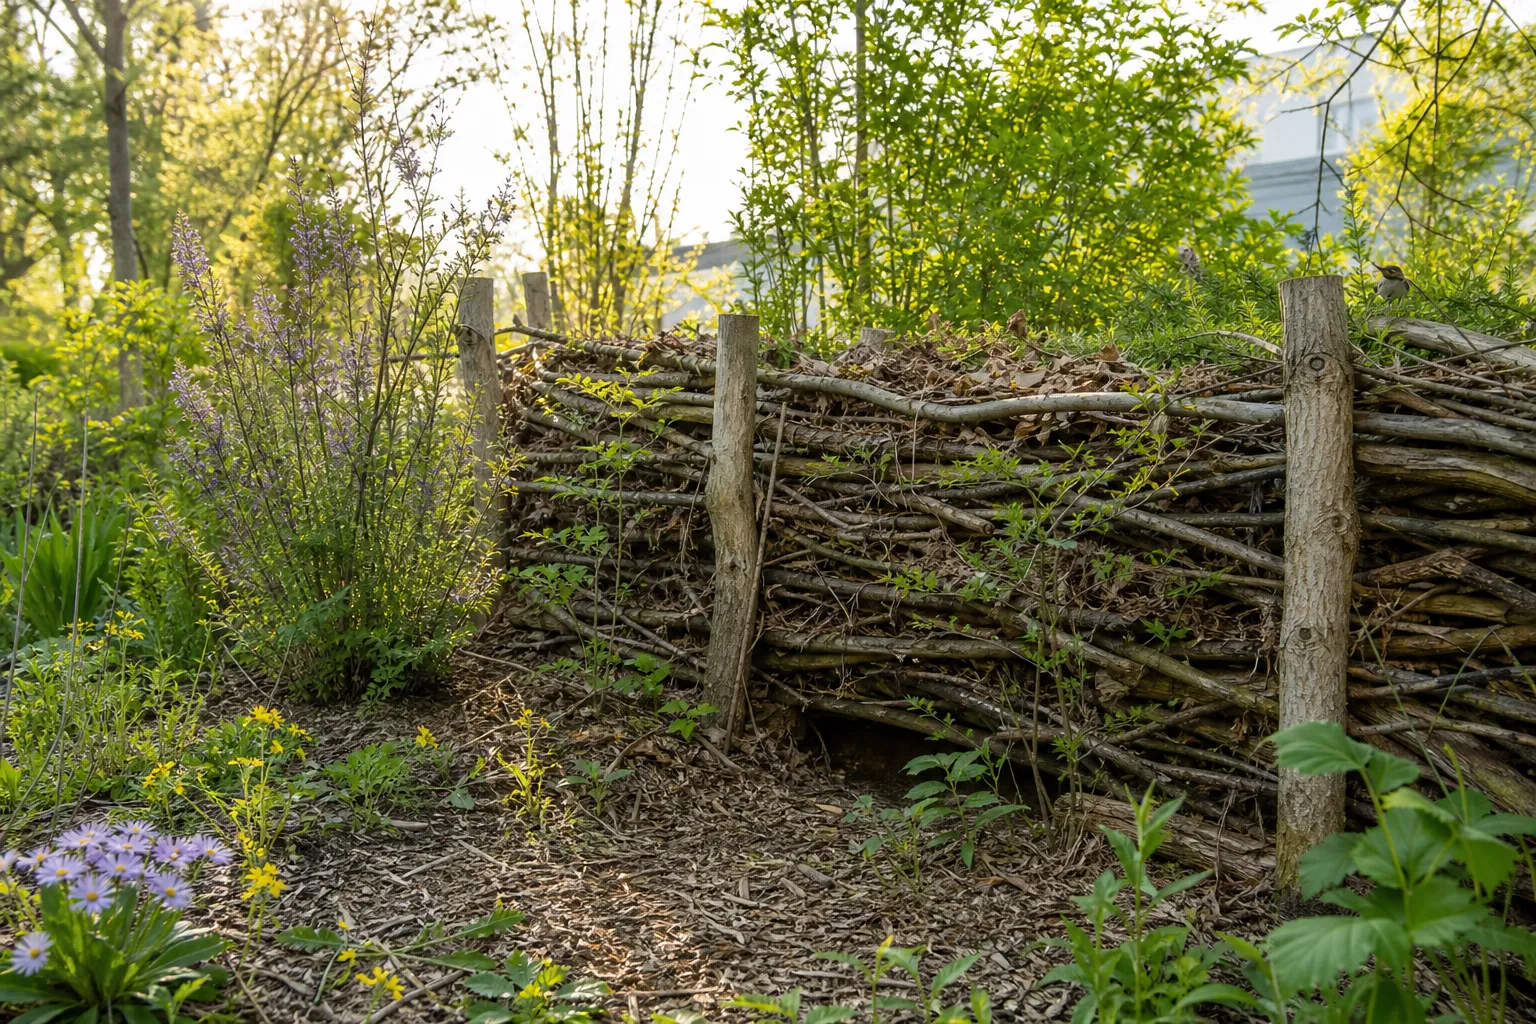
A Benjes hedge is one of the easiest wildlife projects you can build: place sturdy posts in two roughly parallel rows, then fill the space with woody branches and prunings. The result is an informal living landscape feature that provides cover immediately, reuses yard waste, and gradually changes as the wood settles and decays.
Unlike a traditional hedge, a Benjes hedge does not begin with a row of living shrubs. It starts as a dry brushwood barrier, sometimes called a dead hedge, and may eventually become colonized by volunteer seedlings, vines, mosses, fungi, and other plants. In a United States garden, it can work as a screen, boundary, wind filter, composting structure, or wildlife corridor—provided you choose locally appropriate materials and place it safely.
What makes a Benjes hedge different?
The name refers to the German ecologist Hermann Benjes, who promoted the use of stacked woody material as a habitat-building technique. The basic principle is wonderfully practical: instead of hauling every branch to the curb or grinding it into chips, keep some of that organic material on site and turn it into shelter.
The hedge offers several layers of habitat at once. Gaps near the ground can give small animals a place to move and hide. Dense twigs create protected resting areas for birds and insects, while older wood becomes increasingly valuable to decomposers such as fungi and wood-associated invertebrates. The structure may also reduce wind exposure and create a more sheltered microclimate for nearby plants.
It is important to think of a Benjes hedge as habitat rather than a guaranteed wildlife hotel. What visits will depend on your region, nearby vegetation, water, food sources, predators, pets, and the age and design of the hedge. In other words, build the structure, then improve the surrounding garden with native plants and a variety of conditions.
Choose the best location before you gather branches
A Benjes hedge is forgiving, but its location determines whether it becomes a useful garden feature or an inconvenient pile of brush. Walk around your property at different times of day and consider how much sun, rain, and foot traffic the site receives.
- For a wildlife boundary: place it along a property edge, beside an existing fence, or between lawn and a less-formal planting area.
- For a windbreak: position it where it can slow prevailing winds without blocking valuable winter sun from vegetable beds or fruit trees.
- For maximum habitat variety: choose a spot with a mixture of sun and partial shade nearby. A shaded side may stay cooler and damper, while a sunny side can support flowering plants and basking insects.
- For easy maintenance: leave enough room to add branches from both sides and to replace posts later.
- For fire safety: keep dry brush well away from buildings, propane tanks, outdoor cooking areas, chimneys, and any defensible space recommended by your local fire authority.
Good drainage matters. Avoid a low place that regularly holds standing water, especially if the hedge will be packed tightly. Moist habitat is useful; permanently saturated wood decomposes quickly and may become unstable. On the other hand, an extremely exposed, hot site may dry the structure so rapidly that it provides less sheltered cover.
Materials: what to use and what to leave out
You can build a Benjes hedge with prunings from fruit trees, native shrubs, ornamental shrubs, and small trees. A mixture of branch sizes usually creates better structure than a single uniform material. Keep longer, straighter pieces for the main body and save flexible twigs for the outer layers.
Useful materials
- Untreated branches and small logs from your own property
- Hedge and shrub prunings
- Rough poles for the upright supports
- Leafy twigs, as long as they are not carrying invasive seeds or obvious disease
- Natural twine, if you need to temporarily stabilize loose sections
Materials to avoid
- Pressure-treated, painted, or chemically treated lumber
- Wood containing nails, screws, wire, or plastic
- Branches with clear signs of a serious pest or plant disease
- Invasive vines or seed-bearing invasive plants
- Material brought from far away without checking local pest-movement rules
In the United States, moving untreated wood can spread insects and diseases, sometimes even over relatively short distances. The safest approach is to use prunings generated on your own property or from a nearby, trusted source. If a tree was recently affected by a suspected pest or disease, ask your county Extension office, state agriculture department, or certified arborist how to handle the material before adding it to a wildlife structure.
How to build a Benjes hedge step by step
1. Mark two parallel rows
Use stakes or a garden hose to mark the shape. A straight line is simplest, but a gentle curve can look more natural and create small pockets of shelter. Start with a width of about 18 to 30 inches. You can make the hedge wider if you have abundant material, but remember that a very broad structure will need more branches and stronger support.
2. Install the upright posts
Drive sturdy untreated poles into the ground along both rows. Space them about 4 to 6 feet apart, depending on the length and flexibility of your branches. The posts should stand firmly enough to resist wind and the pressure of newly added brush.
A simple garden version may be 3 to 5 feet tall. Taller hedges are possible, but they need deeper, stronger supports and more careful packing. For a small suburban garden, a lower hedge is usually easier to build, safer to maintain, and more visually proportionate.
3. Create a loose base
Begin with the largest branches or short logs. Lay them lengthwise between the two rows of posts, leaving occasional gaps near the ground. A slightly open base gives small wildlife access to the interior and helps prevent the whole structure from becoming a solid, airless mass.
Do not worry about perfect alignment. The goal is a stable, layered structure, not a tightly woven fence. If the base seems too low, add a few crossed branches to create a modest lift and extra cavities.
4. Add branches in layers
Place larger limbs first, followed by medium branches and smaller twigs. Arrange some pieces lengthwise and others across the width so the hedge locks together. Keep the material dense enough to provide cover, but avoid forcing every branch into a rigid bundle.
Longer branches can bridge gaps between posts. Smaller brush works well on the outside, where it softens the appearance and fills openings. If the structure leans, pause and add a crosspiece rather than simply piling more weight on one side.
5. Finish with a stable, slightly uneven top
An irregular top generally looks more natural than a perfectly flat one and creates different perching and sheltering points. Remove sharp stakes or protruding branches that could catch clothing or injure people using nearby paths.
You do not need chicken wire for a typical garden hedge. If you use mesh to help contain loose material, choose a design that cannot entangle wildlife, and avoid sealing the base. A boundary hedge should leave a few ground-level passage points wherever local wildlife needs to move between gardens.
Should you plant into the hedge?
Planting directly into the brushwood is optional. Some gardeners prefer to let natural colonization happen, while others add a living screen nearby. Both approaches can work, but do not assume that every plant will thrive in the same conditions.
Sun-loving native shrubs and wildflowers generally perform best along the brighter edge. Shade-tolerant plants may suit the cooler side. A vine can eventually soften the structure, but choose carefully: vigorous climbers may pull the hedge apart or spread beyond the area you intended.
For a living companion planting, select species suited to your USDA hardiness zone, soil type, moisture level, and mature size. In different parts of the country, good choices might include regionally native dogwoods, serviceberries, elderberries, willows, ninebark, native roses, or certain viburnums—but availability and suitability vary widely. Check regional native-plant lists rather than copying a plant palette from another climate.
Watering: less is usually more
A dead hedge itself does not need irrigation. That is one of its most useful qualities during hot summers and drought restrictions. Watering the brushwood can speed decomposition, but routine soaking is unnecessary and may make the structure settle faster.
Newly planted shrubs or vines are different. During establishment, water the living plants deeply enough to moisten the root zone, then allow the surface to dry somewhat before watering again. As a practical measurement, place a straight-sided rain gauge or empty tuna can near the planting area and aim for roughly 1 inch of total water per week during the first growing season, including rainfall, unless local conditions or the plant’s instructions call for a different schedule.
Measure rather than guessing. A short, frequent sprinkle may wet only the surface, while heavy watering on poorly drained soil can suffocate roots. Sandy soil may need more frequent applications; clay soil may need slower watering and longer drying intervals. Species also differ: a moisture-loving native shrub and a drought-adapted prairie plant should not receive identical treatment.
Maintenance through the seasons
The hedge will settle, shrink, and gradually break down. That is not failure—it is the central ecological process. As the lower layers decay, add fresh branches to the top or tuck them into open sections.
- Late winter: add dormant-season prunings before spring nesting activity becomes difficult to avoid.
- Spring and summer: observe from a distance before moving branches. Birds and small animals may be using the structure.
- Fall: let some leaves remain around the base. Leaf litter adds cover and supports the food web.
- Every few years: check whether posts have rotted, shifted, or become unstable, and replace them as needed.
If you want to monitor the project, take a photograph from the same position once a month. Record when the first bird, pollinator, amphibian, or small mammal appears, and note which sections stay damp or dry. This simple journal turns the hedge into a personal gardening experiment and can reveal which microhabitats your site naturally provides.
Common mistakes to avoid
- Building too close to the house: dry woody material can add fuel near structures, especially in fire-prone regions.
- Using diseased or invasive material: the hedge should not become a distribution point for pests, pathogens, or aggressive plants.
- Making the base airtight: leave some low-level openings for movement and ventilation.
- Overwatering nearby plants: check the soil and measure rainfall instead of following a fixed daily schedule.
- Expecting a living hedge immediately: a Benjes hedge provides structure first; colonization and plant growth take time.
- Removing every fallen leaf: a tidier garden is not always a more functional wildlife garden.
A small project with a long ecological life
A Benjes hedge is a satisfying example of permaculture in practice: observe what your property produces, keep useful materials on site, and design a feature that performs several jobs at once. It can mark a boundary, shelter a young planting, reduce waste, and create habitat without requiring a large budget.
Start with a modest section—perhaps 6 to 10 feet long—and learn from it. Compare a sunny end with a shaded end, try different branch sizes, and watch how quickly the structure settles. With sensible placement, locally sourced materials, and a little seasonal patience, your pile of prunings can become one of the most useful and lively features in the garden.