There is something wonderfully mysterious about a leaf cutting. One day it is simply a detached piece of a plant; weeks later, it may produce roots, tiny shoots, and the beginnings of a whole new plant. But the same leaf can also turn translucent, collapse, and rot before anything happens below the surface.
The difference is not luck alone. A successful leaf cutting is balancing several demands at once: it must stay hydrated without remaining waterlogged, receive enough light to keep its tissues functioning, and activate the plant’s built-in repair and growth systems. If the conditions are too wet, too dark, too cold, or simply unsuitable for that species, decay can win the race.
Here is what happens inside the cutting—and how you can give it a better chance of choosing roots.
First, know that not every leaf can make a plant
Leaf propagation works because some plants retain the ability to produce new roots and shoots from mature leaf tissue. These new structures are called adventitious roots or shoots because they arise in an unusual place rather than from an existing root or stem growing point.
That ability varies dramatically by species. African violets, begonias, peperomias, snake plants, jade plants, kalanchoes, and some other succulents are well-known candidates. A leaf from a fiddle-leaf fig, pothos, or many common garden plants may stay green for a while but fail to produce a complete new plant if it lacks a piece of stem or a viable bud.
This is the first major reason cuttings fail: the material may be healthy, but the plant simply does not have the right biological equipment for leaf-only propagation.
Whole-leaf and part-leaf cuttings behave differently
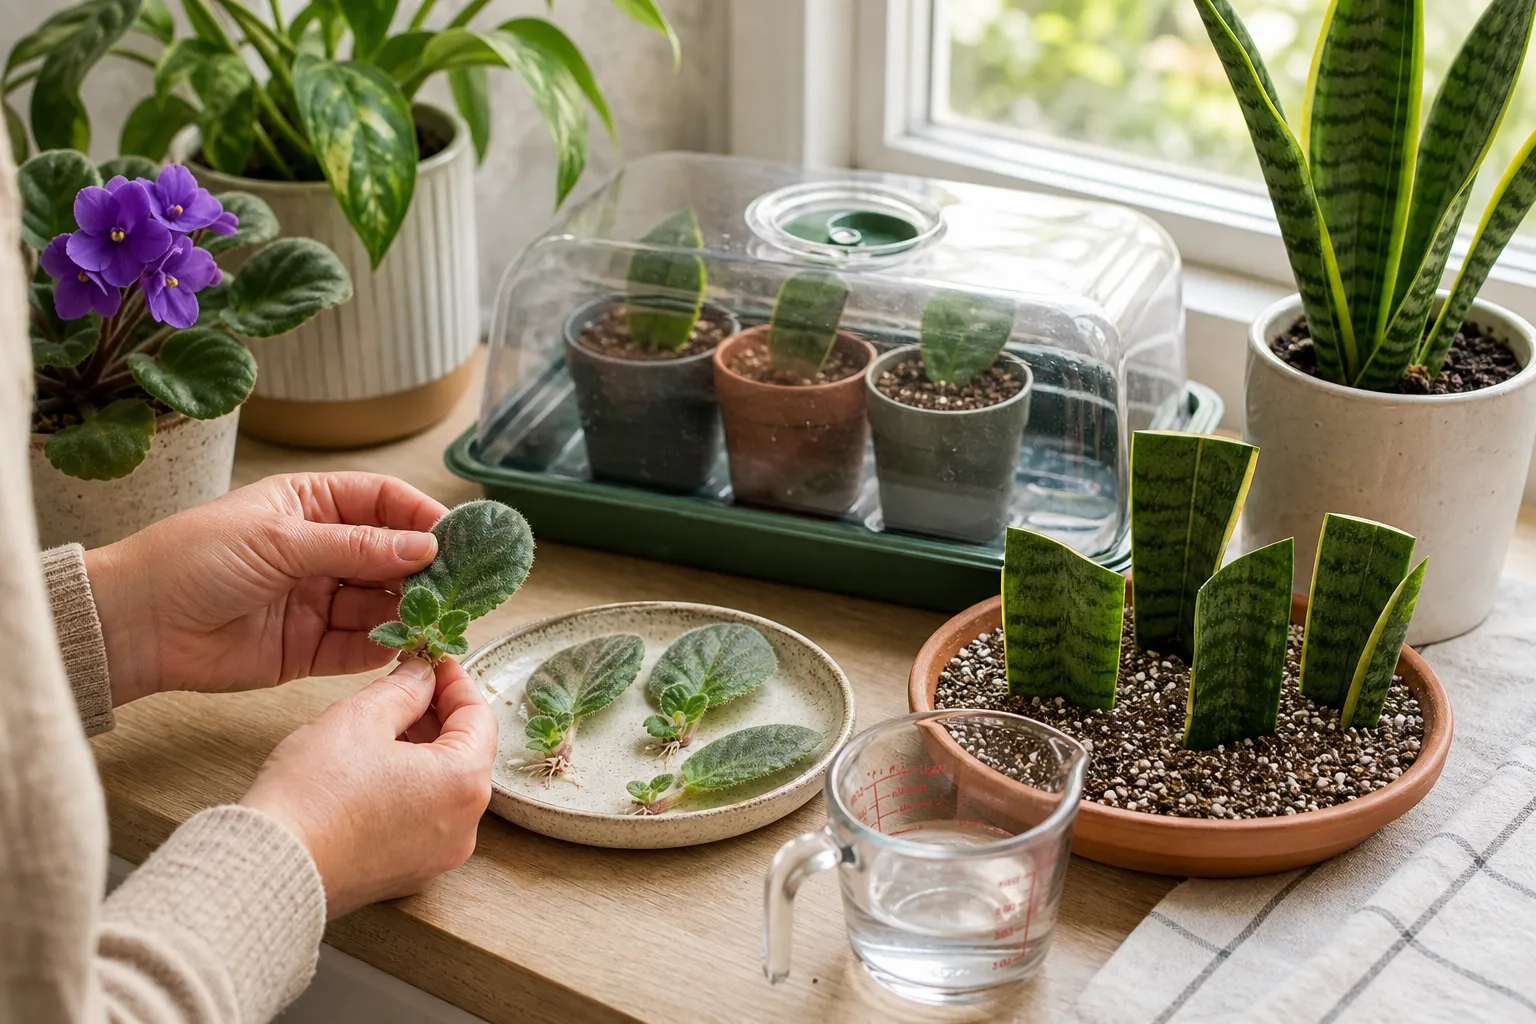
With African violets, peperomias, and some begonias, you usually use a leaf with its stalk, called the petiole. The petiole or the leaf base becomes the point where new roots and shoots may develop.
With snake plants and some other plants, you can cut the leaf into sections. Each piece must remain oriented correctly: the end that was closest to the original roots should go down. If you reverse the section, it may remain alive but fail to grow properly.
Begonia and certain other plants can produce plantlets from cut leaf veins. In that method, the veins—not just the green blade—make contact with the rooting medium. The exact technique matters because the potential growing points are not distributed equally across every leaf.
The first decision happens at the wound
Cutting a leaf creates an injury. The plant responds by sealing the damaged area and redirecting hormones and stored resources toward repair. One visible result may be callus: a layer of new, undifferentiated tissue that forms around the cut surface.
Callus is not automatically a root. It is better understood as a repair zone from which new organs may later develop. In a suitable plant, some cells near the wound can reorganize and become root or shoot tissue. Natural plant hormones called auxins help coordinate this process.
Temperature, moisture, oxygen, the age of the leaf, and the plant’s genetic tendency all influence whether this repair response progresses toward roots or stops at decay.
Why a clean wound matters
A fresh cut exposes moist plant tissue to fungi and bacteria. A dirty knife, reused pot, diseased parent plant, or contaminated potting mix can introduce problems before rooting begins.
For home propagation, it is worth taking a few simple precautions:
- Choose a vigorous, pest-free parent plant.
- Use a clean, sharp blade or pair of scissors.
- Wash used containers and sanitize tools between plants.
- Use a fresh, free-draining propagation mix rather than garden soil.
- Remove damaged, yellowing, or already-soft sections before planting.
These steps do not guarantee success, but they reduce the number of competing problems your cutting must overcome.
Moisture is the narrow path between life and rot
A leaf cutting has no functioning roots at first, so it cannot replace water lost through its pores. It needs a humid environment to slow that loss. At the same time, its cut surface and future roots need oxygen. Saturated, airless media can suffocate delicate tissues and encourage rotting.
The goal is not “as much water as possible.” The goal is a moist but airy rooting environment.
For many indoor leaf cuttings, begin with pre-moistened mix. Water it thoroughly once, let excess drain, and then avoid adding more until the surface has begun to dry. A small container with drainage holes is safer than a large pot that holds a reservoir of wet mix around a tiny cutting.
A simple watering measurement
Try measuring instead of watering by habit. For a 4-inch pot filled with a light propagation mix, start with about 2 fluid ounces of water—one-quarter cup—distributed evenly over the surface. Let the pot drain completely. Depending on room temperature, humidity, and the mix, wait until the top one-half inch feels barely dry before checking again.
Do not treat that amount as a universal prescription. A terracotta pot in a dry, heated room may need attention sooner than a plastic pot inside a covered propagator. The measurement is useful because it gives you a repeatable starting point and helps prevent the common mistake of adding a splash every day.
If you use a clear cover or plastic bag, inspect the inside each day. A light film of condensation is normal. Large droplets running down the sides, standing water on the mix, or a sour smell suggests that ventilation is needed.
Humidity protects the leaf—but trapped moisture can backfire
High humidity slows transpiration, the natural loss of water through tiny pores in the leaf. That is especially helpful for tropical houseplants and tender leaves that would otherwise wilt before roots form.
You can create a humid pocket with a clear plastic bag, a propagation dome, or an upside-down clear container. Keep the cover from touching the leaf if possible, and open it briefly each day to exchange air. Once plantlets or roots appear, gradually increase ventilation so the new growth can adapt to normal household conditions.
Humidity around the leaf and moisture in the rooting mix are related, but they are not the same thing. A cutting can enjoy humid air while sitting in a relatively airy medium. That combination is usually safer than trying to compensate for dry air by keeping the pot constantly wet.
Light supplies energy, but direct sun can cook the cutting
A leaf cutting still needs light because its living cells must continue photosynthesis and manage repair. Bright, indirect light is generally the safest choice indoors.
Strong direct sun through a window can heat a covered container quickly. The leaf may bleach, scorch, or lose water faster than it can replace it. On the other hand, a dim corner may leave the cutting weak and slow the formation of roots and shoots.
A practical setup is a bright north- or east-facing window, or a few feet from a brighter south- or west-facing window with filtered light. If you use a grow light, place it according to the manufacturer’s distance recommendations and provide a consistent daily schedule rather than leaving it on continuously.
Temperature controls the speed of the process
Most houseplant leaf cuttings root more reliably in a warm, stable environment than in a chilly room. A typical indoor target is about 68–75°F. Avoid placing the container against a cold window, above a heat register, or in a drafty doorway.
Warmth speeds biological activity, but excessive heat can increase water loss and encourage disease when ventilation is poor. A warm rooting medium can be helpful for some cuttings, yet bottom heat is not essential for every beginner’s project. Stable room temperatures and careful moisture control often make a bigger difference than buying extra equipment.
Compare plants instead of assuming they all behave alike
A useful way to understand leaf propagation is to compare species with different leaf structures.
African violet
An African violet leaf with a healthy petiole is one of the most beginner-friendly choices. Insert the petiole into lightly moist mix, keep the leaf blade above the surface, and provide bright indirect light. New plantlets may eventually appear at the base, but the timing can vary with cultivar and growing conditions.
Snake plant
Snake plant leaves are thick and water-storing. Cut sections about 2 inches long, keep their original orientation, and allow the cut ends to dry for a day or two before inserting them into a gritty, free-draining mix. Constant moisture is especially risky because the leaf already contains substantial water.
Begonia
Begonias can often be propagated from leaf sections or by placing cut veins against the surface of the mix. Because the new plants form from specific vein areas, a neat, close contact between the cut vein and the medium matters more than simply burying a piece of leaf.
Jade plant and other succulents
Succulent leaves should usually be allowed to callus before planting. Place them on top of a dry or barely moist gritty mix rather than burying them deeply. Once roots or tiny plantlets form, you can gradually introduce a little moisture near the developing roots.
These comparisons reveal an important principle: thick, water-filled leaves generally need more drying and less frequent watering than thin, tender leaves. Matching the method to the leaf is more useful than following a single recipe.
Try a small home experiment
If you want to discover what works in your own space, run a simple comparison using one plant and several similar leaves. Label three or four containers and change only one factor at a time.
- Container A: lightly moist, airy mix and bright indirect light.
- Container B: the same mix and light, but with a loose clear cover.
- Container C: the same mix and light, but watered only when the top one-half inch dries slightly.
- Container D: the same treatment as your favorite method, but using a different cultivar if available.
Record the date, the amount of water added, room temperature, and visible changes once or twice a week. Do not pull every cutting up to check for roots; disturbance can damage new growth. Instead, look for firm tissue, new plantlets, swelling at the base, or roots appearing through a drainage hole.
After four weeks, compare survival, firmness, callus formation, roots, and new shoots. The result will not be a scientific trial, but it can reveal whether your home is too dry, your mix too wet, or one variety is simply more cooperative.
How to tell rooting from rotting
Successful tissue usually remains firm. A callused cut may look pale or slightly thickened, while new roots are often cream-colored or white and firm. New shoots may begin as tiny green bumps or plantlets.
Rot typically progresses differently:
- The leaf becomes translucent, mushy, or dark at the cut edge.
- The base smells sour or unpleasant.
- Brown or black tissue spreads instead of remaining localized.
- The mix stays wet for many days and has poor drainage.
- Roots, if present, are brown and soft rather than pale and firm.
If rot has started, remove the affected cutting promptly. You may be able to save a healthy section by cutting well above the damaged tissue with a clean blade, but success depends on the plant and the extent of the decay. Often, taking a fresh cutting is the most sensible option.
Patience is part of the technique
Some cuttings begin rooting within a couple of weeks; others take several weeks or longer. A leaf that looks unchanged is not necessarily failing. Root development often happens out of sight before new leaves appear.
Resist the urge to increase watering, move the cutting from window to window, or tug it loose every few days. Stable conditions give the wound time to seal and the plant time to reorganize its cells.
The takeaway: help the plant, do not overwhelm it
A leaf cutting grows roots when the plant has the right genetic potential and the environment supports repair without encouraging decay. Your job is to preserve the leaf’s moisture, supply gentle light and warmth, maintain oxygen around the cutting, and keep the wound and growing medium clean.
Start with a species known to respond well, use a healthy leaf, and adjust the method to its texture. Measure your watering for a few weeks, compare varieties when you can, and keep notes from your experiments. With a little observation, the process becomes far less mysterious—and the moment a tiny new plant appears feels even more rewarding.