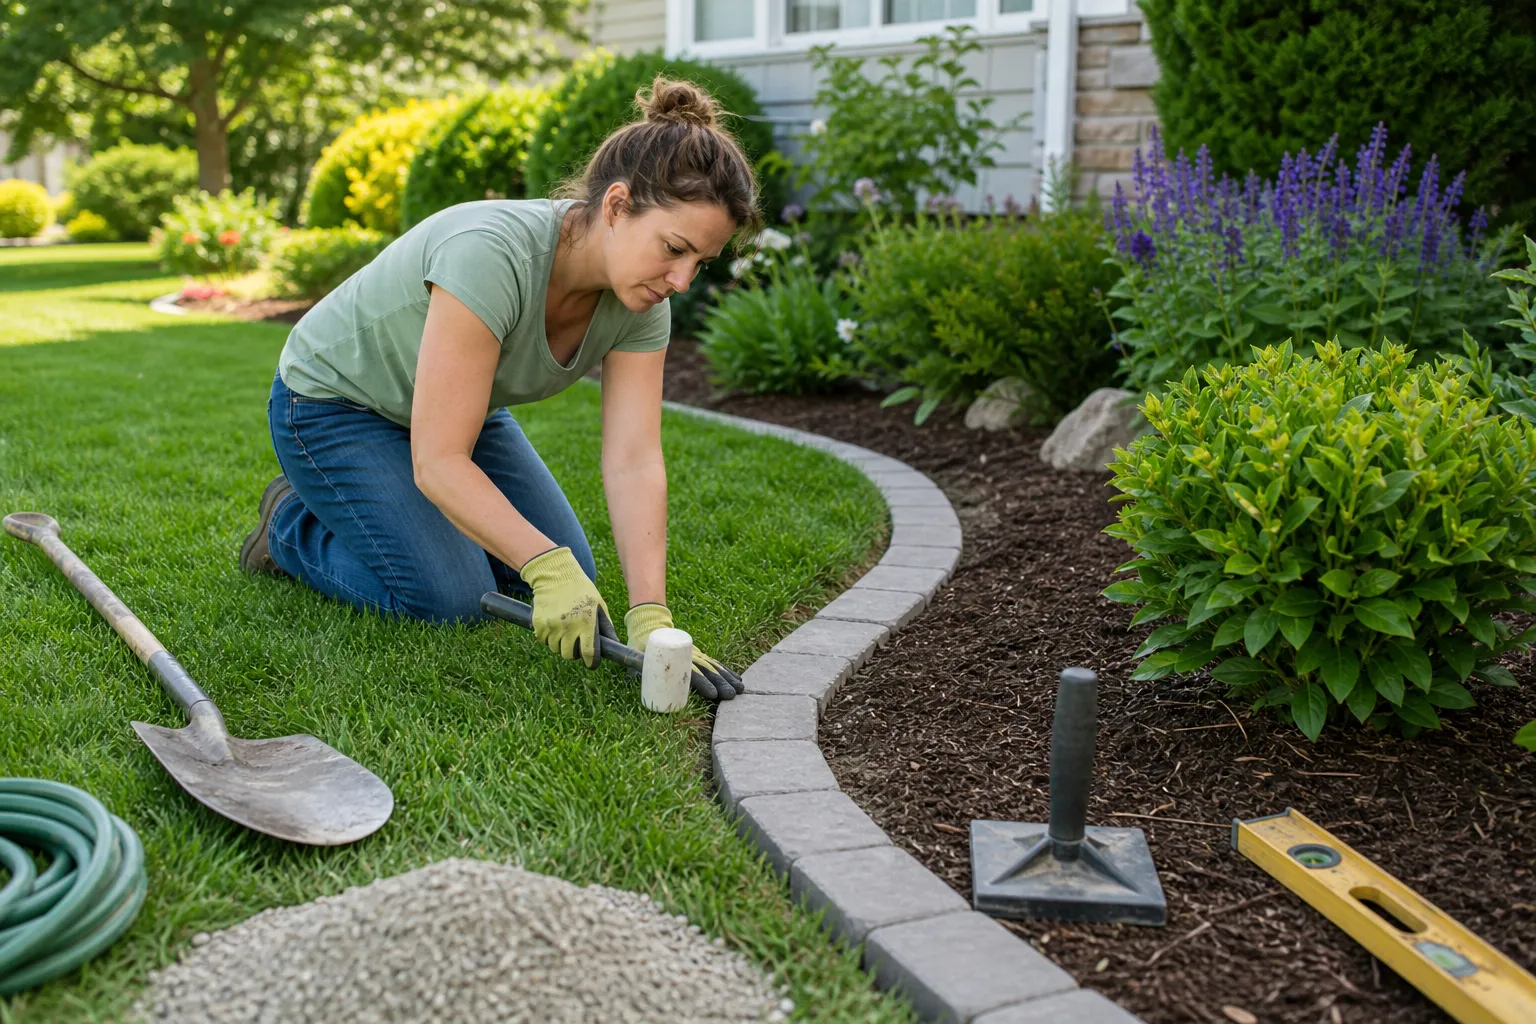
A crisp lawn edge can make an ordinary yard look instantly more polished—and paving stones add a practical finish that is easier to maintain than a simple trench. The stones create a clean transition between turf and flower beds, mulch, gravel, walkways or patios while giving your mower a dependable boundary to follow.
This is a manageable weekend project for a beginning gardener, provided you take time to prepare the base properly. The most important details are not the stones themselves, but the layout, trench depth, drainage and firm support underneath.
Why use paving stones as a lawn edge?
Paving stones offer more than decoration. A well-installed border can help keep lawn runners from creeping into beds, contain mulch and reduce the need to recut the edge every few weeks. It also gives you a hard surface that can sit beside the mower deck, helping you trim grass without repeatedly scalping the turf.
Compared with flexible plastic edging, stone is heavier and more visually substantial. Compared with metal edging, it usually creates a wider border and may be more comfortable around play areas or frequently used paths. The trade-off is that paving stones require more excavation and a properly compacted base to prevent shifting.
Concrete, brick or natural stone?
Before you buy anything, compare the look and handling of the materials available in your area:
- Concrete edging stones: Usually uniform in size, easy to align and widely available. They suit straight, formal borders and are often the simplest choice for a first project.
- Clay bricks: Warm in color and attractive in traditional landscapes. Their smaller size makes gentle curves easier, although you may need more individual pieces.
- Natural stone: Offers variation in color and texture for an informal look. Pieces may differ in thickness, so leveling can take longer.
- Large landscape blocks: Create a bold border and may work well on a slight slope, but they can be heavy and harder to adjust by hand.
For a neat mowing edge, choose stones with a reasonably flat top and a consistent thickness. Avoid pieces with sharp projections that could catch mower wheels or become trip hazards.
Plan the border before you dig
Walk around the yard and decide whether the stones will separate the lawn from a planting bed, a gravel path, a driveway or a patio. A border that looks good on paper may feel awkward when it meets a downspout, gate, tree trunk or walkway, so mark the entire route before committing.
For curves, lay a garden hose, rope or flexible tubing on the grass. Step back and view the shape from several angles. Broad, sweeping curves generally look more natural than a series of tight bends, and they are easier to build with rectangular stones.
Measure the marked line and calculate how many stones you need. Divide the total length by the approximate length of one stone, then add about 10 percent for cuts, breakage and layout adjustments. If your stones are sold by the piece, this estimate will help you avoid an extra trip to the store.
Check the practical details
- Call 811 before digging so underground utilities can be marked.
- Keep the border clear of sprinkler heads, irrigation lines and low-voltage lighting where possible.
- Do not create a low spot that directs water toward a foundation, garage or neighboring property.
- Plan how a mower will approach the edge. A border that sits slightly above the lawn can be attractive, but a large step may make mowing and walking less convenient.
Tools and materials
Gather everything before you begin. You will need:
- Paving or edging stones
- Shovel or half-moon lawn edger
- Garden hose, rope, marking paint or wooden stakes
- Tape measure
- Hand tamper
- Rubber mallet
- Level, preferably 2 to 4 feet long
- Crushed paver base or compactable gravel
- Coarse leveling sand or paver sand
- Wheelbarrow and bucket
- Work gloves and eye protection
- Broom and garden rake
For a short border in firm, well-drained soil, a hand tamper may be enough. If you are building a long edge or working in loose, wet or clay-heavy soil, a plate compactor can save time and produce a more consistent base.
Step 1: Mark the lawn edge
Set your hose or rope along the final line and adjust it until the shape feels right. Mark both sides of the planned stone border if the stones are wide enough to require a substantial trench.
Try placing a few stones on the grass before digging. This quick dry layout helps you spot awkward transitions and shows whether the chosen width looks balanced beside the lawn and planting bed.
Step 2: Cut and remove the turf
Use a half-moon edger or sharp spade to cut straight down along the lawn side of the mark. Then remove the grass and roots from the trench area. Roll up usable sections of sod if you want to repair bare patches elsewhere.
Dig deeply enough to accommodate the stone, the base material and a small amount of adjustment space. For many decorative edging stones, a trench about 4 to 6 inches deep is a useful starting point, but the correct depth depends on the stone thickness and the finished height you want.
Aim for the top of the stones to sit close to the lawn surface or only slightly above it. If the border will separate turf from a bed, you may choose to leave the stones a little higher on the bed side to help contain mulch, but avoid creating a tall wall beside a mowing route.
Step 3: Prepare a stable base
Remove soft soil, roots and organic debris from the trench. Organic material decomposes and settles, which can leave stones uneven. If you find saturated soil, improve the drainage before continuing rather than simply covering the problem.
Add a layer of compactable crushed stone or paver base. For a typical garden border, start with roughly 2 to 4 inches, spreading it evenly. Compact the material in thin layers with a hand tamper. The base should feel firm underfoot and should not pump or shift when you press on it.
Next, add about 1 inch of coarse leveling sand. Sand gives you a fine adjustment layer, but it should not replace the structural base. Too much loose sand can allow the stones to wobble or settle after heavy rain and freeze-thaw cycles.
Step 4: Set the first paving stone
Begin at a visually important point, such as the corner of a bed or the meeting point with a walkway. Place the first stone on the sand and check it from front to back and side to side with a level.
Add a little sand underneath to raise a low spot. If the stone sits too high, lift it out and remove some material rather than pounding it deeply into an uneven base. Use a rubber mallet for gentle adjustments, tapping the stone until it sits firmly.
For a lawn edge, the stone usually works best when its top is nearly flush with the grass. This allows a mower wheel to pass alongside it without dropping into a deep channel. Check your mower deck and wheel position before setting a long run of stones.
Step 5: Continue along the border
Set the next stone beside the first, keeping the joint consistent. Many garden borders look good with a narrow gap of approximately one-quarter inch, while irregular natural stone may need wider, varied joints.
Work in short sections, checking the overall line every few stones. A single stone that is slightly out of alignment can make the entire border appear crooked, especially along a straight run.
- Use the level frequently rather than waiting until the end.
- Keep the tops visually consistent, even if the ground has a gentle slope.
- Follow the land’s natural grade instead of forcing the border perfectly level across a sloping yard.
- For curves, use smaller stones or pieces designed for curves when possible.
- Never force a stone into place if it rocks; correct the base beneath it.
Step 6: Handle curves and cuts
Rectangular stones create a faceted curve, with each piece changing direction slightly. This can look attractive when the curve is broad. For a tighter bend, choose smaller units or use purpose-made curved edging stones.
If a precise fit requires cutting, use a suitable masonry-cutting method and follow the tool manufacturer’s instructions. Wear eye and hearing protection, gloves and an appropriate dust mask, and work outdoors in a stable area. Concrete and masonry dust can be hazardous to breathe, so avoid dry cutting near doors, windows or children’s play areas.
Step 7: Backfill and lock the stones in place
Once the entire line is installed, check for rocking stones and correct them. Then backfill tightly along both sides with the soil you removed, paver base or a compatible planting material.
On the lawn side, press soil firmly against the stone without burying the top. On the bed side, bring soil or mulch up to the lower portion of the stone. This lateral support helps reduce movement from mower wheels, foot traffic and seasonal soil expansion.
For a border beside a paved surface or a location that receives frequent traffic, consider an additional restraint system designed for pavers. Follow the product instructions; restraint edging is generally installed alongside the perimeter rather than underneath the paving stones.
Step 8: Finish the joints and inspect drainage
Sweep coarse sand or suitable joint material into visible gaps. Do not leave piles of sand on the lawn, where they can smother grass. Lightly water according to the joint-material instructions, taking care not to wash loose material out of the joints.
After the first significant rain, inspect the border. Look for ponding, washed-out soil or stones that have settled. A paving-stone edge should guide the transition between surfaces, not create a dam that traps water against the lawn or planting bed.
If runoff is a concern, choose a layout that lets water spread into a planted area or lawn rather than flow rapidly toward a storm drain. Permeable paving systems can help manage water, but they depend on a carefully prepared drainage base and are more involved than a simple decorative border.
How to keep the edge looking sharp
The new border will reduce maintenance, but it will not eliminate it. Grass can still grow over the stones, soil can wash from a bed and freeze-thaw movement can create small gaps.
Every few weeks during the growing season, walk the edge and remove grass clippings or soil that have accumulated on top. Trim any runners that cross the stones. If a stone moves, lift it, rebuild the base beneath it and reset it rather than simply kicking it back into place.
Different materials age in different ways. Concrete usually keeps a consistent shape but may show dirt or weathering. Brick develops a softer, more established appearance over time. Natural stone varies from piece to piece, so a little irregularity is part of its character.
A simple comparison test before you build
If you are undecided between materials, create a small test section using three or four stones of each type. Place the samples beside the lawn and view them in morning and afternoon light. Compare the color with your house, walkway, mulch and existing hardscape.
Also test the practical details: roll a mower wheel beside the stones, check whether the edge feels comfortable underfoot and pour a bucket of water nearby to observe where it drains. This small experiment can reveal problems before you excavate the full border.
Common mistakes to avoid
- Skipping the base: Stones placed directly on soil often settle unevenly.
- Using too much sand: A thick, loose sand layer can make the border unstable.
- Installing the stones too high: A raised edge can interfere with mowing and become a tripping point.
- Ignoring drainage: A beautiful border is not successful if it causes standing water.
- Rushing the layout: Small changes to a hose-marked line are much easier than rebuilding a finished edge.
- Failing to support both sides: Backfill tightly against the stones to limit movement.
Enjoy the finished look
A paving-stone lawn edge is one of those projects that rewards careful preparation more than advanced skill. Mark the shape patiently, build a firm base, set each stone deliberately and pay attention to where water travels.
Once the border is in place, your mowing routine becomes simpler and your beds gain a clear visual frame. Start with a short section if you are new to hardscaping. With a level, a rubber mallet and a little time, you can create a durable edge that makes the entire yard feel more intentional.